SearchUser loginOffice of CitizenRest in Peace,
Who's new
Subscribe |
How to Build Your Own Solar Panels in Only Two Hours and Have Free Electricity For the Rest of Your Life!(= PREPARE NO ELECTRICSubmitted by Quest-News-Serv... on Tue, 10/27/2015 - 01:29.
 Solar is inarguably the most commonly chosen form of alternative power. It is relatively easy to install, costs nothing to operate (once installed) and works pretty much anywhere. There is also abundant sunlight available for conversion to electrical power. The one problem with solar is its cost: installing enough solar panels on your home to power everything can cost upwards of $30,000. Even so, solar is still the king for alternative power. Many preppers use it, as it allows going off-grid for your electrical power needs, without a major power plant or supplies of fuel. In a survival situation, it is probably the most reliable source of electrical power, especially when used in conjunction with a battery backup system. While most people buy ready-made solar panels or even buy them from a solar contractor, this isn’t the most cost effective way of getting solar for your home. You’re much better off, cost wise, building your own; as they can be built for about half the cost of buying. All you need is some simple tools and the ability to solder. You may also like: Every Day Carry Tools For No Fools An Important Bit of TheoryBefore we try to build anything, we’d better understand what we need. A solar panel consists of a number of solar cells, connected and mounted together, so that they produce a useable output. This is all based on being able to charge 12 volt lead-acid batteries, much like the batteries that are used in a car. In order to ensure that there is enough electrical power to charge 12 volt batteries, it is necessary to produce at least 14 volts. However, solar cells don’t always put out the maximum possible voltage. At times, they only put out 80% of their power, especially on cloudy or rainy days. So, it’s necessary to design the solar panels to produce even more voltage. Typically, they are built to provide 18 volts, 50% more than the nominal 12 volts of the batteries. Each solar cell produces 0.5 volts, regardless of its size. Larger solar cells produce more watts of power, but they are still producing 0.5 volts. So, in order to get 18 volts, 36 of them have to be connected together. But how they are connected together is important.
There are two different ways of connecting solar cells together, what is known as “in series” or “in parallel.” Like batteries, solar cells have a positive side and a negative side. The “front” side of the solar cell is blue and is the negative side. The “back” side is grey and is the positive. The easiest way to understand the difference between series and parallel is to think of a batteries. A flashlight has the batteries installed in series, so that the positive end of one battery (the end with the nipple) is in contact with the negative end of the other battery (the flat end). This allows the current to flow from one battery to the next, adding the voltage together.
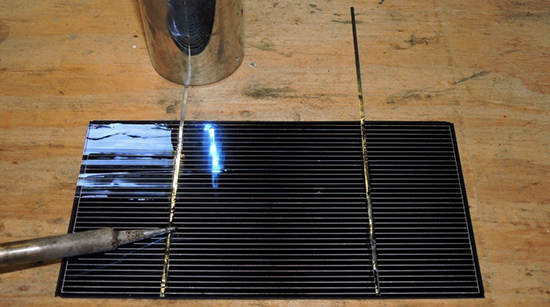
Related: How to Get Power Out of Your “Dead” Batteries Connecting the batteries or solar cells in parallel, where all the positive ends are connected together and all the negative ends are connected together (separate of the positive ends) doesn’t affect the voltage. But it does increase the total wattage or current that the string of solar cells can produce. When connecting in parallel, the wattage of the cells is added, while the voltage stays the same. So, a common size solar cell, such as 3″x 6″ will produce a consistent amount of current, regardless of the manufacturer. For the 3″x 6″ cells, this is 1.8 watts. When we hook two of these together in parallel, they produce 3.6 watts, but still only produce 0.5 volts. Typically, solar panels are built by connecting enough solar cells together in series to make 18 volts. Then, those strings of solar cells are connected in parallel, adding the current together. Whether this is done in one solar panel with multiple strings in it, or by connecting various panels together in parallel depends on the size of the solar panels being used. Soldering the Solar CellsSolar cells can be purchased either “tabbed” or “untabbed.” This refers to whether or not they have lead wires already soldered to them. As soldering the lead wires to the cells is the hardest part of the project, there is an advantage in buying tabbed solar cells, but manufacturers do charge more for them. Tabbing Solar CellsThe “tab” on solar cells is done with a special wire, known by the convenient name “tabbing wire.” This is a 2mm wide solid, flat, uninsulated wire. The wire is tinned, which means that it is coated in solder, making it easier to work with. Pieces of this wire must be soldered first to the negative side of the solar cells, “tabbing” them, and then to the positive side, stringing cells together. Before soldering the tabbing wire to the cell, you must use a rosin flux on the contact area that was shown in the photo of the solar cells above. A single thin swipe of the pen over the contact area is sufficient.
Technically, it is not necessary to tin the contact area on the solar cell with solder, before soldering on the tabbing wire. But my personal experience has been that there isn’t enough solder on the pre-tinned tabbing wire to guarantee good contact; so I always tin mine first, applying the smallest amount of solder possible. It is important to realize that solar cells are extremely fragile. They are made of paper thin glass, to which the photosensitive silicone has been applied. You can break one just by looking at it wrong, as the saying goes. So, they must be handled with extreme care. They will also break if overheated. I use a temperature controlled soldering iron, set to 700 degrees for soldering solar cells and I’ve never had a problem with breaking one from heat. Related: What a Prepper Should Do Around The House Once the contact area is tinned, the tabbing wire can be soldered on. Additional solder won’t be needed, as the solder on the wire and on the cell’s contact will be sufficient to make a good solder joint.
It is highly useful to hold the near end of the tabbing wire down while soldering it. I normally do this, but with one hand on the soldering iron and the other holding the camera, I couldn’t. If you don’t have a soldering tool for holding it down, a small screwdriver will work. Stringing Solar CellsWith all the solar cells tabbed, we’re ready to connect them together to make strings. Related: This is the ONLY MAP That Should Be in Your Survival Kit At this point, you need to decide how your solar panel is going to be configured. More than anything, this means how many cells you’re going to have in a row and how many total rows of cells you’re going to have in the panel. I usually use 12 cells in a row and three rows in a panel. However, you may choose to use a different configuration, due to available space or the size of the glass you have available to make the panels. Just as we tinned the negative side of the solar cells, before tabbing them, we need to tin the pads on the positive (back) sides of the solar cells. So, apply some flux just to the pads and as little solder as you possibly can. Refer back to our first photo if you need to. The solder will not stick to the back side of the solar cells, anywhere but where the pads are. Lay the cells face down, with the tabbing wires from one cell overlapping its neighbor. Align the tabbing wires with the pads on the back side of the solar cell and solder in place. Once again, you shouldn’t need to add any additional solder to make a good connection. However, you will need to hold the tabbing wire down onto the cell or it will lift when you remove the soldering iron.
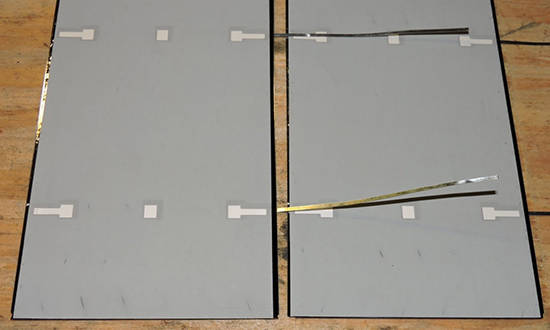
As you can see from the photo, the space between individual cells is minimal. There’s only about 1/8 inch there. While this spacing is not critical, you don’t want to allow so much space that your string won’t fit in the panel. It can be helpful to use a yardstick or straight piece of scrap wood as an alignment guide, to ensure that your string of solar cells doesn’t end up with a curve in it. Related: How to Build a Solar Oven Mounting the Strings of CellsIf we are going to make three separate strings, they will have to be connected together to make one large string of 36 cells. However, it’s easier to mount the strings of cells first and then connect them together. Attempting to handle three strings of 12 cells that are connected together is just about a sure recipe for disaster. http://beforeitsnews.com/self-sufficiency/2015/10/how-to-build-your-own-solar-panels-in-only-two-hours-and-have-free-electricity-for-your-the-rest-of-your-life-2496004.html?currentSplittedPage=1
http://realneo.us/content/anti-speciesism-quest-ministries-gofundme-plea... anti-speciesism - Quest, ministries - gofundme - please donate or
( categories: )
|
Support Civic Journalism Recent comments
Popular contentToday's:
All time:Last viewed:
|